I found it quite real, and even a little humbling.
I also learnt quite a bit about time management and efficiency, and simply put, once there becomes a CLEAR deadline to work to, you can get work done prettttty quickly, and still pretty good too
.

These are some pictures of some laser cut profiles i made in Rhino3d from some plans id found i think through Volpin. Took me a bit to really visualise and scale it to fit my head, i had some awkward moments standing in front of the mirror with a bunch of rulers attached to silly rigs trying to look out the corner of my eye to see the measurements. It was fun tho. and the final turned out spot on in scale, so it paid off.
 Styrobond applied to all surfaces to glue foam together. Air dry for around 20 minutes before putting together. Styrobond applied to all surfaces to glue foam together. Air dry for around 20 minutes before putting together. |

Blocking it out in foam

band-saw first

Rough shape

Sand with 40 grit through to around 100 to 180.


figured out i needed this angle in here, used string.

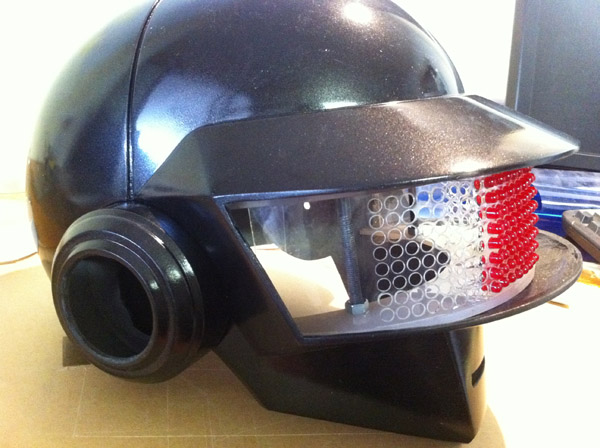
lasercut yet again some more components for visor structure.NOTE: I do not recommend Polycarbonat be cut in laser cutter. Woowee it stinks.

crude, but the idea is there.


 Id say a bondo equivelant, but we call it Bog. Bog. what a funny word.

Learnt a lot in how to go about efficiently shaping up compound curves.

More bog.

a mixmatched robot head. still a mess.


had some scrap mdf around, so i cut to form top and bottom parts of visor


i used some pvc pipe for the ears. There were virtually the spot on diamater.

bit more bog, sanding, prime coats as tests.

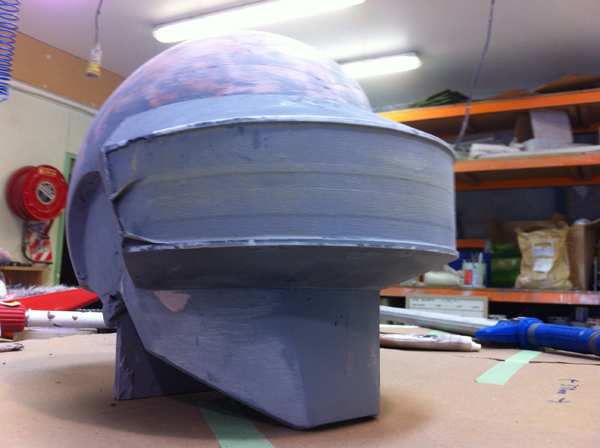


definition starting to take place. ish.


black was introduced.

one technique that served well was colouring the bog with poly pigment. It allowed you to see where exactly you had already sanded between the pink and black layers.


starting to get there.


still there were lots of air bubbles that had to be filled in. Prime coats helped this out quite a bit at times.


lathed up an ear piece, whcih i later added to a piece of pvc. I then made silicone molds from these, which youl see later.

befond being sanded.

the hole in the middel was quite ugly, but i had plans on gutting out the middle with a 50mm wide hole to allow for some speakers to be set in. so i didnt worry too much.


My deadline started creeping up on me pretty quickly. Initially i was just doing this entire project to learn techniques, and go through the motions of documenting a process, but the sevens came up. Sevens is a big thing here in Wellington NZ, its every year around february 3 and 4th. its on fro two days, and there are 16 games of rugby which are basically shorter in play and a lot more fast paced. everyone gets dressed up, drunk, rowdy, and ends up not even really watching the games untill it gets to the finals. All in all its an interesting expeirence, and Carmen and i were given tickets for christmas, so we were dfinatly going, and i needed a costume, so i thought WHY NOT DAFT PUNK..
So that is how my deadline got shifted from months, to virtually weeks.

Anyway, i began to prepare for fibreglassing, great thign about it was i had intially designed my helmet on Rhino3d so i simply clicked the outline, offset it by 2 or 3 mm, and printed it on the lasercutter. SIMPLE. ahh the fortune of a lasercutter. cheating i know.. but then again is it..?

had to also make some flanges around the opening, completely forgot abotu them the whole time. hot glued them in place.
I also waxed on, and waxed off 3 times, i never knew id ever actually say those words. but i did.
waxed on, waxed off.
I also coated it with about 6 coats (fine mist spray) of PVA to help as a release

its weird, to thing you do all this work, and then you suddenly just paint all this white stuff over your nice tidy model. But i knew it wouldnt stick due to my waxing on and off so i had faith.

By this time it was about 10 at night, and i was tired, i had a big day, and i was sitting, waiting for my gel coat to dry. FOOOOLISHLY, i completly forgot i could have just got out the hot air gun and speed up the curing process, so i got impatient and ended up coating on fibreglass as it became 'tacky', but as i applied the fibreglass, i noticed the gel coat was mixing in. I freaked. I must have been to sleepy to realise. so i went with it anyway, and thought !@# it.. lets just see how this turns out.


a fake action shot... i thnk it had already cured by now.lol.. but YOU dont know that..


as it cured i decided to make a silicone mold of the ear piece.

not one, but two.
 \
\
It had cured, so i turned it over, took out my jig, and repeated the process.

This time i made sure i was more patient with the gel coat, i also got out the hot air gun and used it to speed up the curing process.

This time the fibreglass applied beautifully. and gave that expected ugly brown tinge i was hoping to have seen on the FIRST half. this made me happy.

beard.

Oh here is the solicone mold, you probably cant make out much of it. but its there, with some blue tinted easy cast which ws slosh cast around inside it.

ohk so that half had cured also, so i drilled some holes to keep them lined up and trimmed the edges
 they came apart relatively easily.
Another reason not to use polycarbonat, it buckled under the heat or reaction with the fibreglass and so it warped itself. FORTUNATELY, it had zero affect on the actual important parts of the mold. This made me happy. But was also an honest and valuable lesson.

See the waves. Ugly.

The two halves came out super well! i expected there to be patches and fibreglass textures everywhere but apart from the visor, it cam eout great. mind you a couple airpockets were here and there, but they were minor and fille din with bog in seconds.

two halves put together. lines up great!

moment of truth as i got to try out how well i scaled it. and low and behold it fit like a glove. or a helmet i should say.

two halves nice and clean. what i dont end up showing in here is that i actually install some lasercut vents and a flexiblestrip for the fake partline over the top. quite a good technique as it ensures a nice crisp detail. However will need to me re-installed every time i pull a mold.

just a check to see the easy-cast fit back into the master mold.

the top right cast had cracked as was super thin on one side, so i learnt the importance of keeping slosh-casting consistent. i took it on as a test to see how easy it is to cut open. Success.

ohk so you can see the fake partline inserted in there under the fibre glass.
I learnt a whole lot when fibreglassing these two halves.first up i put a shallow lining of fibreglass on the two halves separately, then quickly put them together and fibreglassed over the seam, joiing them into one piece, i had to constantly moniter all sides asit would sometimes collapse inwards , and we DO NOT want that. But as it cures it would stiffen up, making it easier to control.


birds nest.

i then trimmed the edges, and ensured there were no major overhands left behind.

took a littl ebit of prying but i got it done!. you can see there is a patch where some of the fibre glass cloth created an airpocket, but its on an area that will be cut away. A great first pull i reckon.